Taking photographs under ground is a dark art in just about every way. The problems can be enormous, but when the results are good the graft involved just floats away.
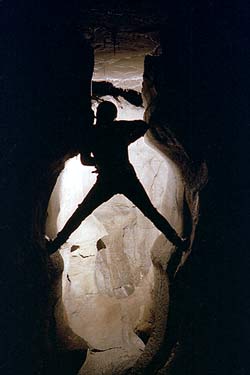
Some shots can be very easy, like the photo of the cave pearls on the last page, others like the picture on the right can become epic tasks.
I first started trying to take underground pictures in old slate mines. Whilst a few shots were acceptable, most were a complete failure. The large dark chambers absorbing light like beer into a beer mat.
A course run in cave photography by Jerry Wooldridge FRPS at the, then, National caving centre Whernside Manor taught me many tricks of the trade. The successful results of the weekend gave impetus to try out more underground shots, some of which are here on these pages. |
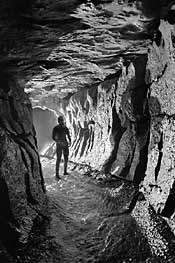
Bill Lakin high up in the rift passage of Kat Knot cave, North Yorkshire. |
|
The streamway of KingsdaleMaster Cave |
The problems
- No light. Pretty obvious really.
- The environment. Water, mud and high humidity don't agree with precision camera equipment. Getting all the gear to the site can also be a rough ride too.
- Co-operation. Finding other cavers to stand around posing or holding flash guns can be the hardest task of all!
|
The solutions
- Lighting.
For convenience electronic flash guns are the norm. Flashbulbs do have their place though, as they have a greater light output and the longer duration of the light pulse makes water look less frozen.
- Environment.
Preparation has to begin well before the caving trip. Cameras and lenses are best left overnight somewhere nice and warm. This helps to prevent lenses misting up as soon as they are exposed to the cold damp air underground. Equipment is usually packed in army surplus ammunition boxes, lined with protective foam. Ammo boxes are damn tough and water proof, their only disadvantage is their weight. As you can see from the shot below one advantage is that they float so it isn't too onerous dragging them through very wet passages.
- Co-operation.
A set of prints after the trip works wonders, as does buying an extra round in the pub after the trip.
|
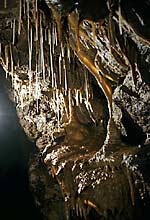
Stalagmites in CrackpotCave, Wensleydale
|
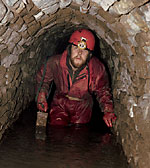
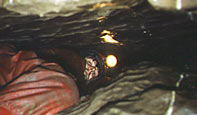
Just getting there can be a problem. A waterproof camera box is essential. |
Techniques
Once beyond daylight underground, flash guns provide the only practical form of illumination in British caves and mines. Whilst bulb flash guns have a greater light output and duration, most shots are taken with electronic flash guns. Electronic flash is cheaper and far more widely available. The disadvantage of this light source is it's aversion to humidity, but nothing the resourceful caver can't get round.
The first important decision the cave photographer needs to make is what he wants to photograph and how it should be lit. With no other light sources available, the photographer has almost complete control over the lighting. There are two main ways of shooting with flash guns underground;
- Synchronized flash.
This uses "slave" units to fire one flash gun from the light of another. The current state of the art uses a flash gun mounted on the camera, but covered with an Infra red filter so that no visible light is emitted. The slaves then fire from the infra red pulse of light. There are three main advantages to this technique; firstly as all the flash guns fire simultaneously there is no need for a tripod. Secondly there is no frontal light so there is great creative potential for lighting, see an example of this on my lighting page, and lastly the infra red slave units are extremely sensitive and will work out of direct line of sight.
- Time exposures and manually fired flash.
This uses the fact that there is NO light underground at all. Cap lamps are turned off, the camera shutter opened, the flash guns are then fired manually and the shutter closed again. This can be very simple with only one flash gun, the camera is just held by the photographer and then another caver fires off the flash unit. With more than one flash gun the camera needs to be fixed so a tripod is needed, but this can allow more attention to be paid to the framing of the shot.
|
Thankfully passages this small are pretty rare. You don't want to be pushing too much gear through spaces this tight. |
A final and very important credit must go to the cavers who have helped me get these shots, especially my good friend Bill Lakin who has stuck with me and posed in some crazy situations. Thank you Bill!