Once if people wanted to photograph a wide vista without a specialist panoramic camera there was only one way. Take several pictures around the view, then place them together in an album. This often gave very pleasing results, in a rough and ready way.
Now with computer technology on many people's desktops there are more sophisticated ways of joining those pictures together.
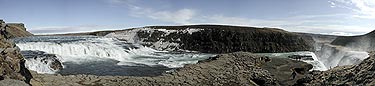
The picture above was made by stitching together seven different, hand held, photographs in the computer using special software written to stitch pictures together to make one large seamless picture.
Shooting for panorama stitching
Equipment
Almost any camera, digital or normal, is capable shooting stitched panoramas, but some features are especially desirable. The most important feature is to be able to use the same exposure for each shot, either by using manual control or by locking the automatic exposure. Some digital cameras now have this feature especially for shooting panoramas.
To get the best results it's best to put the camera on a tripod so that the camera can be accurately rotated and the horizon on the picture doesn't vary. If haven't a tripod available, you'll need to take great care to hold the camera level between shots and be very careful how you rotate round as you shoot.
Beware of using filters, especially polarising filters, whose effects may vary as the camera is moved.
Position
Look around and give some thought to where the best place is to take the pictures from. If you're shooting handheld, try to ensure there's nothing too close to the camera position that may be difficult to overlap when assembling the pictures later.
Try to find a position in shade if you can so that sunlight won't fall into the lens and cause flare.
Exposure
Possibly the most important thing to get right if you want to join pictures together invisibly is getting the exposures to match. To get that right make sure you use an exposure that will work for the entire sequence, so be careful not to use an exposure just for the bright or dark part of the scene. For panoramas with large amounts of sky, be sure any clouds don't burn out and loose detail. It's generally easier to get shadow detail back from dark areas, rather than loosing important highlight detail.
Sequence
The most important thing to remember is to allow sufficient overlap between frames of the panorama. Most software packages need at least 20 percent overlap, so a good rule of thumb is to allow a quarter of a frame.
Another consideration is when to take the sequence. Think about how any moving objects or people may reappear in other frames or may overlap joins, if in doubt shoot more frames to ensure you have enough static material to patch things up when you're back home.
To see how I took the photos on my immersive imaging web pages, have a look at my "how to" page.