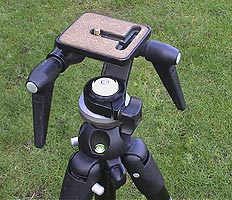
 Manfrotto junior pan and tilt head. 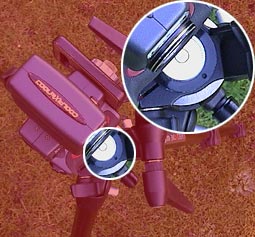 Looking down to show how the camera is mounted with the lens axis over the centre of rotation. 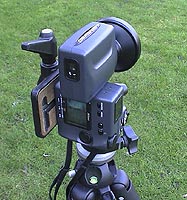 The complete assembly with wide angle adaptor ready to start shooting. |
Most of the 360° panoramas on this site were shot in same way, with the same equipment. Here's how they were done.
Having found a good location, out comes the tripod. I use a Manfrotto 441 carbon fibre tripod. These are very light and easy to carry, they also have a small built in spirit level that aids getting everything set up quickly. The only disadvantage of these tripods, apart from their cost, is that they can sometimes be too light when lightly loaded with just a little camera. It's no fun having to run to catch the tripod as it's blown over in a gust of wind.
I use it with Manfrotto's junior pan and tilt head. This little head is ideal for panoramic photography as it's possible to get the lens axis very close to the rotational axis of the head. This helps prevent parallax problems between frames when stitching the photos together. There also a nice space to put a decent sized spirit level on to ensure the head is completely level. The little level you can see in the pictures is also used to ensure the camera is also level once fitted onto the pan and tilt head.
For most of my panoramas I've used a Nikon 990 digital camera. At 3.3 megapixels it has sufficient resolution to make acceptable sized prints from the final panoramas. It also has an exposure and white balance lock for matching exposures and the ability to take wide angle adapators to get really wide shots. I've found that my camera has a slight unevenness in exposure across the length of the frame that can cause banding when the photographs are stitched together, so I always use the camera sideways in portrait format to avoid the problem. Using the camera in this orientation has the advantage of giving a wider vertical field of view too, but it does mean that you need to shoot more photographs to make a complete circle.
Once carefully set up and levelled, I try to shoot the complete sequence as fast as possible to avoid getting too much movement between frames.
Once the panorama has been shot the photos are checked on my computer and assembled into a panorama. To get the best results I use a combination of different programs.
Copies of the original files are placed into a new directory/folder and then selected in "The Panorama Factory" software. Once the correct settings for lens angle and NO exposure matching are set in the program's preferences it's left to assemble the panorama and the final project resulting is saved to the folder. At this stage the result can be very good, if I'm lucky. However most times automatic software such the The Panorama Factory can leave tell tale blurs where it has joined the pictures. removing those blurs is a touch awkward, but the results are far better when printed out.
Within the folder are a set of bitmap files created by The Panorama Factory that have been warped by the software to correct their perspective, usually called panorama_warped_n.bmp. As created these files can't be read by my favourite image editing program Photoshop 7, so the files are taken out and converted into a format Photoshop can use with the help of Paint Shop Pro.
Finally each of the warped files is dropped as a new layer into a new image created in Photoshop big enough for the complete panorama. Each frame is aligned manually and locked to it's matching layer, temporary changes to the layers opacity can make it quite a quick operation. Once all the frames are in alignment, the frames have their edges cut with a soft edged eraser so that there are no sharp changes in detail anywhere. When everything is finally aligned and cut to make good joints, the entire image is flattened and any excess areas cropped off.
Now is the time to make any adjustments to the tonal balance of the whole image and make any manipulations that are necessary. Finally I'm left with a folder with about 800mb of images to back up and then delete all the unwanted intermediate images.
|
 How it's done